
⏱ 6 Reading Time
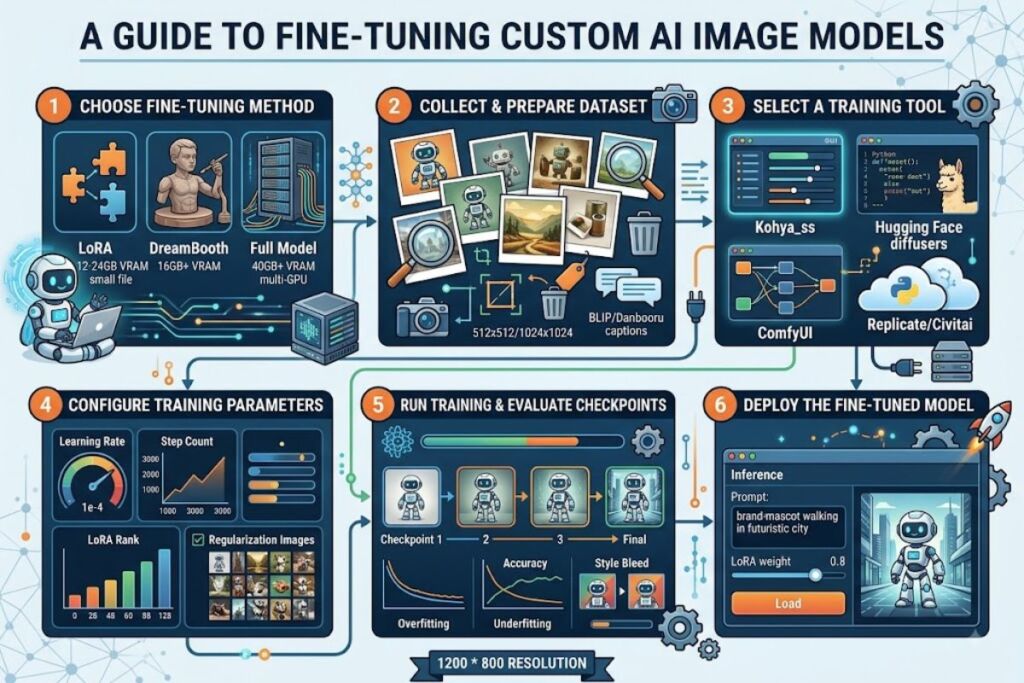
Fine-tuning a custom AI image model means adapting a pretrained diffusion model — such as Stable Diffusion, SDXL, or Flux — to generate images of a specific subject, art style, or domain that the base model doesn’t produce reliably on its own.
Step 1: Choose a Fine-Tuning Method
LoRA (Low-Rank Adaptation) is the standard method for most custom image models in 2026, because it trains a small set of adapter weights instead of the full model, cutting VRAM requirements and file size dramatically.
Four methods dominate diffusion model fine-tuning:
- Train a LoRA adapter — 10–200MB output, runs on 12–24GB VRAM, trains in 1,000–3,000 steps.
- Fine-tune with DreamBooth — retrains a larger portion of the U-Net, needs 16GB+ VRAM, produces stronger single-subject fidelity than LoRA.
- Learn a Textual Inversion embedding — trains only a new token embedding, leaves model weights untouched, works on 8GB VRAM.
- Retrain the full model — updates all weights across a large dataset, requires multi-GPU setups with 40GB+ VRAM per GPU.
Example: A designer building a consistent brand mascot across 500 marketing images trains a LoRA at rank 32, because it balances subject fidelity with fast iteration and small file size for distribution.
Step 2: Collect and Prepare a Training Dataset
Dataset quality determines output fidelity more than any other single factor, and the required image count varies by method: 15–50 images for a single-subject LoRA, 100–500+ for a broader style LoRA.
Build the dataset with these actions:
- Gather images with consistent subject or style but varied pose, angle, lighting, and background.
- Crop every image to match the base model’s native resolution — 512×512 for SD 1.5, 1024×1024 for SDXL.
- Remove duplicate or near-duplicate frames, since redundant images bias the model toward overfitting on that pose.
- Caption each image with a text file describing its contents, using either natural-language captions (BLIP-style) or comma-tag captions (Danbooru-style), depending on the training script.
Example: For a product-photography LoRA, 40 images of the same object shot from 8 angles under 5 lighting setups, each captioned with the object name plus a background descriptor, trains reliably in under 2,000 steps.
Step 3: Select a Training Tool
Kohya_ss and Hugging Face’s diffusers library are the two most widely used tools for LoRA and DreamBooth training on Stable Diffusion and SDXL, both actively maintained as open-source projects.
- Kohya_ss — a GUI wrapper around training scripts, supports LoRA, DreamBooth, and textual inversion, runs locally on Windows/Linux.
- diffusers — Hugging Face’s Python library, ships official
train_dreambooth_lora.pyandtrain_text_to_image_lora.pyscripts for direct scripting control. - ComfyUI — node-based interface that supports training extensions alongside its inference graph.
- Hosted platforms (Replicate, Civitai’s trainer) — run training on remote GPUs without local hardware, billed per training run.
Example: A developer with an RTX 3090 (24GB VRAM) installs Kohya_ss locally and trains an SDXL LoRA in roughly 45–90 minutes for 2,000 steps, depending on batch size and resolution.
Step 4: Configure Training Parameters
Learning rate, step count, and LoRA rank are the three parameters with the largest effect on output quality, and each needs tuning to the dataset size and method chosen.
Configure these settings before starting a training run:
- Set the learning rate between 1e-4 and 1e-6 — LoRA typically uses 1e-4, full fine-tuning uses 1e-6.
- Set total steps between 1,000 and 3,000 for LoRA on a 20–50 image dataset.
- Set LoRA rank between 4 and 128 — rank 32 balances adapter capacity and file size for most single-subject use cases.
- Add regularization images for DreamBooth — a set of generic class images (e.g., generic photos of a dog when training one specific dog) that prevents the model from forgetting the general class concept.
Example: Training a character LoRA at rank 16, learning rate 1e-4, batch size 1, for 1,500 steps on 30 captioned images completes without visible overfitting artifacts in test generations.
Step 5: Run Training and Evaluate Checkpoints
Generating test images at multiple checkpoints — not just the final one — is the only reliable way to catch overfitting before it locks into the saved model.
Evaluate training runs by checking for these three failure patterns:
- Check for overfitting — output images replicate training photos almost exactly and ignore new prompt instructions.
- Check for underfitting — the trained subject or style barely appears, requiring more steps or a higher learning rate.
- Check for style bleed — unwanted elements from training images (a specific background, outfit, or color palette) appear in every output regardless of prompt.
Example: Generating four test images at checkpoints 500, 1,000, 1,500, and 2,000 steps, using the same prompt each time, reveals the exact step count where the LoRA starts losing prompt flexibility.
Step 6: Deploy the Fine-Tuned Model
Loading the trained LoRA or checkpoint alongside the base model in an inference tool — AUTOMATIC1111, ComfyUI, or a diffusers pipeline — completes the fine-tuning workflow.
Deploy the model with these actions:
- Load the LoRA file into the inference tool’s LoRA folder or node.
- Set LoRA weight/strength between 0.6 and 1.0 to control how strongly the adaptation influences output.
- Include the trigger word chosen during training in every prompt that should activate the concept.
- Combine multiple LoRAs at reduced individual weights (e.g., 0.5 each) when blending a style LoRA with a subject LoRA in one generation.
Example: A trained “brand-mascot” LoRA loaded at weight 0.8 alongside the SDXL base model, prompted with “brand-mascot walking through a city street, cinematic lighting,” produces on-brand output consistent with the training set.
Frequently Asked Questions
How many images are needed to fine-tune an AI image model?
LoRA training on a single subject needs 15–50 images; a broader style LoRA needs 100–500+ images. DreamBooth typically uses 10–30 images plus a matching set of class regularization images.
Does fine-tuning require a paid GPU service?
No. LoRA training runs locally on consumer GPUs with 12–24GB VRAM using Kohya_ss or diffusers. Hosted platforms like Replicate or Civitai’s trainer are optional alternatives for users without local GPU hardware.
What’s the difference between LoRA and DreamBooth?
LoRA trains small adapter weights layered on top of the frozen base model, producing a 10–200MB file. DreamBooth fine-tunes a larger portion of the base model’s own weights, producing a full checkpoint several gigabytes in size.
Can a fine-tuned model work with SDXL and Flux the same way?
The core workflow — dataset prep, captioning, LoRA training, checkpoint evaluation — applies to both. Base resolution, VRAM requirements, and specific training script flags differ between SD 1.5, SDXL, and Flux architectures.
Related Reading
Best AI Coding Tools in 2026 (Overall Ranking) ,Best 20 AI Writing Tools in 2026 (Tested & Ranked), Best Free AI Image Generators (No Watermark), FLUX.1 Kontext Review, FLUX vs Midjourney, FLUX.2 Pro vs Nano Banana Pro,How to Use FLUX.1 Kontext for Photo Editing